#Loopmaster Deals
Explore tagged Tumblr posts
Visit Tumblr Blog
Explore Tumblr blogs with no restrictions, modern design and the best experience.
Last Seen Tumblr Blogs


Fun Fact
130K people were victims of a chain letter scam that affected Tumblr in May 2011.
Text

Make sure to take a look at the Affiliate Program. 💻🌟 Plugin Boutique Deals Best Audio Plugin Deals AI VIDEO EDITOR CAPCUT AI AI VIDEO GEN MAKE YOUR VOICE LIKE FAMOUS SINGERS Loopmaster Deals Loopcloud Deals
#MUSIC TECHNOLOGY#MUSIC PRODUCER#MUSIC PRODUCTION#MUSIC COMPOSER#Make sure to take a look at the Affiliate Program. 💻🌟#Plugin Boutique Deals#Best Audio Plugin Deals#AI VIDEO EDITOR#CAPCUT AI#AI VIDEO GEN#AI SINGERS#MAKE YOUR VOICE LIKE FAMOUS SINGERS#Loopmaster Deals#Loopcloud Deals#PluginBoutiqueDeals#LoopmasterDeals#LoopcloudDeals#AudioPluginDeals#MusicSoftwareDeals#MusicProductionDeals#SoundDesignDeals#AIVideoEditor#CapCutAI#AIVideoGen#AISingers#VoiceTransformation#AffiliateMarketing#AffiliateProgram
0 notes
Text
if i was stuck in the time loop i would never do anything with truly fucked up consequences for no good reason except just because i was in the time loop because i would always be thinking "imagine how fucked up it'd be if the loopmaster was like lol time to ruin this loser's life and let them deal with the consequences of that one"
5 notes
·
View notes
Text
Apologies for that previous update. I was... dealing with heatstroke, I think...?
Something was up, at least. Anyways, today I'd have liked to talk about the Café again, given there was a bit more still to cover, but instead, the topic of developments in the town bit more... immediately relevant.
To start with, a number of new houses are being/have been put up to accommodate the influx of refugees from Faeflight *and* the newly cleansed Pokemon that both we and Team Surge have been saving. There's lots of new faces in town, and Embark's looking way more lively... It's nice.
So, there's a new store looking to open in town, a bank, and the would-be proprietor Duskull needs investments. We've decided to take them up on that, and will offer the requested 10,000 Poké. Having an extra-safe place to store the Gold Bars we've come across, well... we kind of need that.
Finally, there's OUR shop that just opened! Rosa the Kirlia, who we cleansed in Faefall, is now running a store that specializes in safely extracting Emeras from Looplets, normally only possible for a certified Loopmaster. It's 250 per Emera, open every day! Any explorers in the area should stop by and give it a try, it's super useful.
#pmd#pmd ocs#rotomblr#ttrpg#aschimos#embark town news#not sponsored#but i do directly benefit from any sales made#so#:3c
1 note
·
View note
Text
Make Future Bass In Garageband
Wi Bass
How To Make Bass In Garageband
I have a few tips that I’ve picked up over the years that I’m going to share with you today. While starting Garageband for the very first time can seem like a challenge at first, after a month or so of practicing, it all starts to come together. But there are definitely some helpful features we all should know and learn how to use. In this tutorial today, I’ll offer a few tips to help you for when you first start out.
35 votes, 17 comments. 16.1k members in the GarageBand community. Press J to jump to the feed. Press question mark to learn the rest of the keyboard shortcuts.
Made this video 2 months ago and this song have been in production for 6 months, and 8 months including these 2 months.
Dubstep has now been popular for a surprisingly long time, with the first club night dedicated to this emerging genre established as long ago as 2001. However, you’d be forgiven for thinking that it’s a brand-new sound for a new generation, such is the momentum the style has managed to build over the last few years.Starting with artists such as Burial, dubstep first gained a loyal.
How do I make a good 808 bass like in every trap song ever? For example Future's 'March Madness' or Drake and Future's Digital dash? I not only have the basic garage band stuff but I also have the Lokamotiv plugin.
How To Make A Future Bass Drop In this tutorial, producer Tim Cant shows you how to make a hard-hitting future bass drop using samples and MIDI from Loopmasters’ Future Vibes. With sounds ranging from jazzy chord progressions and trap-inspired beats to full-on wobs and Reeses, Future Vibes features everything you need to make a future bass smash.
by the way, I have a list of all the best products for music production on my recommended products page, including the best deals, coupon codes, and bundles, that way you don’t miss out (you’d be surprised what kind of deals are always going on).
First things first.
When you first open up Garageband on your Apple product (I recommend this MacBook Pro from Amazon), the software will bring you to the last project you had open.
However, assuming it’s your first time, it’ll bring you to the “Choose A Project” page, on which you can choose whether to start a new project, open up a template, or look at Apple’s very own Garageband tutorials.
Start An “Empty Project.”
Assuming you want to get started right away on something fresh, from scratch, click on “Empty Project.”
Factory Templates
However, if you want, there are Factory Templates to choose from, but I’d suggest not using them until later.
If you decide to go the template route and pick the other options besides “Empty Project,” it’ll give you 6 different templates to choose from, including “Songwriter,” “Voice,” “Electronic,” “Amp Collection,” “Keyboard Collection,” and “Hip-Hop.”
Depending on what your goals are, each project template is obviously geared toward a different purpose.
For instance, if you load up “Songwriter,” Garageband offers a previously-created set of track regions and instrument tracks like the Southern California Drum Pre-set, a Tracking Vocal, a Natural Strum Guitar, a Brit Clean guitar, A Modern Stack amplifier, and a Steinway Grand Piano.
When loading up the Hip-Hop template, you’ll get a number of different synthesizers, including the Sweeping Arp, the Deep Sub Bass, and the Arctic Noise Lead, in addition to the Trap Kit Drummer Track.
The templates are actually quite cool, and they’re worth testing out.
But for the sake of this tutorial, I’ll suggest sticking to an empty template.
The plus side to the templates, other than their convenience and ease-of-use, is that it allows users to get to work almost immediately, without even having to load up software instrument tracks, drum tracks, microphone settings, and so on and so forth.

When I first started, I just chose “Empty Project,” because I wanted to learn everything from the ground-up.
Once you’ve cut your teeth at building things from scratch, moving on to handy templates is as easy as anything.
Track Formats and Types
GarageBand comes with three different track types, MIDI, Audio, and Drummer tracks, which are green, blue, and yellow (orangish/yellow), respectively.
Each one serves a very specific purpose, but, I imagine the one you’ll grow most accustomed to is the MIDI.
MIDI
Controlled by either a MIDI controller or the Mac’s keyboard, the MIDI track region and the notes are always green. MIDI stands for Musical Instrument Digital Interface and the piano is almost always the instrument on which MIDI controllers are based. This is one reason why I recommend grabbing PianoForAll from their website – it’s a simple piano course that will help your music production skills big-time.
MIDI allows users to create an innumerable amount of software instruments, including drum kits, bass, and electric guitars, keyboards, synthesizers, arpeggiators, and so on and so forth until the end of time.
MIDI is amazing because we can go in and edit things piece by piece, something that isn’t quite as easy when recording actual analog parts, like an electric guitar, for instance – although I know there is software for that as well.
Despite the existence of more sophisticated software that allows us to edit pre-recorded tracks, MIDI is still the simplest to use and the most convenient for sure.
The MIDI instruments rarely sound as good as the analog equipment which they’re based, but they’re more than sufficient.
Added to that, with the increasing technological sophistication of MIDI and plug-ins, in general, the sound is also getting quite a bit better as the years go by.
If you intend on making a lot of hip-hop beats and electronic music, MIDI will be your best friend.
Audio
There are two subsets of the Audio (blue) track, including the one that looks like a Voice, and the one that looks like a Guitar. Audio track regions are always blue.
The first one is meant for recording vocals or other “real instruments” through either Mac’s internal microphone or an external microphone.
The Guitar one is to access the litany of effects, guitar, and bass amps through an audio interface. As I’ve mentioned in other articles, the best audio interface is the Sapphire 6USB from Focusrite, the iRig I/O, or the Focusrite Scarlett 2i2.
If you’re a beginner, I recommend getting the Focusrite Scarlett 2i2 from Amazon, due to the fact it’s a bit cheaper and smaller then the Sapphire 6USB both of which I’ve written about before.
A solid interface is definitely a worthwhile purchase. The Focusrite Sapphire 6USB I bought 8 years ago is still the one I use to this very day (although, I have since upgraded to the Scarlett 2i2), and it’s been incredibly helpful.
Putting audio interfaces aside, the Audio track regions are the actual recordings, rather than just MIDI notes, created through a controller or MIDI keyboard.
Due to the nature of the file, we can’t adjust an audio recording with the same ease as we can with MIDI, for obvious reasons. However, there are certain things we can do to make adjustments, little tips, and tricks.
Here’s what Audio files look like:
Audio files are almost always blue, although, the most recent update gave users the ability to change the color of the tracks.
Drummer Track
The drummer track is a fan-favorite. Personally, I sometimes use them, but not that often.
They truly are incredible, however. They sound great, are simple to use, and are just a great way to quickly add a rhythm section to your song. Definitely worth checking out.
There are six different genres to choose from, including 5-6 different drummers with unique style in each sub-category of music.
There is Rock, Alternative, Songwriter, R & B, Electronic, Hip-Hop, and Percussion, in addition to the different sub-genres in each of the aforementioned styles.
You can also change the complexity, loudness, and the preset that comes with each drummer, as well as the prevalence of cymbals, hi-hats, kicks, and claps.
There really is quite a bit to choose from, and you can play around with this stuff for hours.
Getting Started
Once you’ve selected “New Project,” and then “Empty Project,” you’ll see that we have an empty workspace before us, with the software instrument tracks on the left, the Smart Controls on the bottom, and then the Key Signature, Tempo/BPM, and Time Signature in the top-center of the DAW.
For me, personally, the first thing that got me instantly hooked to Garageband was the fact you could easily record an instrument and then start another one right back up for harmonies and the beat.
Starting out with the basics, pick a Software Instrument that you enjoy, I chose the Steinway Grand Piano, the Synthesizer sub-setting: String Movements, and the Beat Machine in the Electronic Drum Kit settings.
The moment you click on the instrument, it’ll change the Track Region into the one you chose, and then after that, you can add as many track regions as you’d like by using the command, (Command + D) to duplicate.
Simple Commands
Hitting (Option + Command + S) will bring up a new software instrument track, and hitting, (Option + Command + A), will bring up a new Audio track.
Hit the Red button near the Play, Rewind, Fast Forward, and Stop buttons, and then use your computer’s keyboard to start experimenting with the instrument.
It’s not a bad idea to turn on the metronome, which turns purple when it’s been selected, as well as the 1/2/3/4 count-in button.
Hit the (Command + K) button to bring up the Keyboard so you can actually start playing with the Software Instrument.
In the future, you can buy a MIDI Keyboard like the M-Audio Keystation 49 from Amazon, but when you’re first starting out, I recommend just getting used to Mac’s “Musical Typing” feature, which means, in other words, the little keyboard that pops up.
My compositions definitely improved and got more interesting when I bought a MIDI Keyboard, and I also started teaching myself how to read music again, which will come in handy in a big way as a music producer (you don’t have to read music if you don’t want, though).
It’s awfully hard to learn that purely with Musical Typing.
Tools You’ll Use Everyday
The next thing to understand is the Loop Pointer, and then the Resize Pointer.
These are crucial, and you’ll soon find out why. Once a melody has been created, you can infinitely loop that melody over and over again using the Loop Pointer until the end of time.
Wi Bass
This stops us from having to play it over and over again.
Moreover, you can actually copy and paste the MIDI region, either using (Command + C) function and then (Command + V), respectively, or just double-clicking (right-clicking) and choosing the “Copy” option that comes up.
The Resize Pointer is so that we can extend the MIDI region for as long as we want, and even create notes manually in the Piano Roll below the Workspace, which brings me to my next point.
The Piano Roll includes the Score editor – among other features – and we can edit the MIDI notes in this section in case something is either off-key or off-tempo.
To bring up the Piano Roll, just double click on the Green MIDI Region and then the Piano Roll will show up at the bottom.
It’s all fairly intuitive, just drag and drop the MIDI notes with your track-pad and you’ll soon figure it out all out.
A tip, however, is to make sure that your MIDI notes fall exactly on the grid-lines, that way everything is synchronized and in-time together.
Additionally, try and keep your MIDI Regions just four measures long, in other words, in 4/4 Time Signature.
Before going on to more complicated meters, at least learn how to make music in 4/4 time.
Loops
And how could I forget to mention loops, arguably the most popular feature of both Logic Pro X and Garageband? The loops, while not my favorite thing in the world, are immeasurably helpful, convenient, and simple to use.
And as I wrote in this article here, they’re royalty and copyright-free, so you don’t have to worry about paying anyone or getting sued if you make a hit song with one of them.
Garageband comes with, literally, thousands of loops in approximately 25 different genres of music.
There are plenty to choose from, and each one can be shifted in both key signature as well as in tempo, so they’re highly adaptable, in other words.
Also, while using my guide, there is a way of creating your own loops and adding them to the Loops Library, which can actually be quite handy later on.
Especially if you’re trying to make adjustments to a piece of music, while not adjusting other music in the same song.
To gain access to the Loops, just click on the button that looks like a little hose.
The Loops section comes with a browser, permitting Garageband users to search through all of the loops using a number of different genres, styles, and types of emotion. It’s a fairly intuitive system.
Click on whatever category you’d like, Instrument, Genre, or Descriptors.
The loops here are pretty awesome. Each one inspires me to make something else.
In addition to describing each style with three different categories, an option can be turned on in the preferences which allow us to see the key signature of the loop and tempo.
While the loops are adaptable to whatever tempo and key signature, It’s handy to know the original key for compositional purposes.
You’ll remember when I just mentioned that Garageband sounds come in three different formats, MIDI (Green), Audio (Blue), and the Drummer Track (Yellow).
This is also how the loops are organized, so some of them are even MIDI, which means you can adjust the notes to something slightly or entirely different.
Musical Typing and Basic Commands and Other Features:
Click on the Command, (Command + K), after opening up Garageband and “New Project,” and that’ll bring up the keyboard, or “Musical Typing,” as the developers named it.
Through the use of the keys on your laptop, you can compose music with a one-octave digital keyboard. It’s not the greatest thing in the world, but it’s a great way to start out as a beginner, without spending any money.
Hitting the pale-yellow or orange keys on the Musical Typing keyboard will adjust at which octave the Keyboard will play, and then the pale-yellow key turns up the velocity, or in other words, how hard the note is being played by the player.
There’s also a Pitch-Bend key and a Sustain tab, both of which I almost never use.
And to be honest, I don’t think that anyone else does either, with the exception of the Sustain tab, which some may use when playing a MIDI piano.
The Modulation Keys, the purple ones on top of the Musical Typing key, are pretty dope. It’s basically like turning on a bit of vibrato on the sound, kind of like a flanger.
It was actually about half-a-year before I went out and bought myself a MIDI Keyboard. That goes to show that you don’t really need to buy all of this stuff.
A lot of the gear-buying for musicians can get quite out of hand. You’ll find yourself buying all kinds of stuff as a musician/music producer, from guitars, audio interfaces, analog pedals or equipment like compressors or a professional-grade microphone.
Copy, Cut, and Paste:
Use the (Command + C) keys to copy a piece of music/MIDI/or drummer track in the workspace, and then hit the function, (Command + V) to paste it into the workspace as a recording or MIDI region or whatever it is.
A useful feature is copying a whole bunch of different files at once and then pasting them over into something else, like perhaps, moving them to the end of the song.
Other important things to note for beginners:
When you first download, Garageband, it comes with a variety of different instruments, sounds, and loops, however, we can actually get our hands on more of them.
If you go into the Garageband settings, on the top of the toolbar, and click on the heading beside the “File” sub-category that simply says, GarageBand, You can quickly see from the top of the menu, the 3rd option is the “Sound Library.”
Click on “Sound Library,” and then “Download All Available Sounds,” bringing a whole bunch of other great instruments.
Keep in mind, these downloads will take quite a bit of time, so do it when you’re sleeping.
Using the drummer track in Garageband is really quite simple.
All it really takes is for you to make a riff/melody, and then load up the drummer you think sounds the best.
It doesn’t get more sophisticated than that, really. However, through the adjustment of some parameters, you can make a big difference in the way it sounds.
For the first few months of using Garageband, I almost never used the drummer track simply because I was trying my best to figure out how to make songs right from scratch.
I would recommend for you to do the same thing. And by “make songs from scratch,” I mean, creating drum tracks on your own.
Once you’re much further along, you can throw in the drummer track if you need something quick, or replace a drummer entirely.
by the way, I have a list of all the best products for music production on my recommended products page, including the best deals, coupon codes, and bundles, that way you don’t miss out (you’d be surprised what kind of deals are always going on).
Garageband’s Drummer Track, whether you’re using it on your iPhone (here’s the one I recommend from Amazon) or with Mac OS, really is good, and most people won’t be able to tell the difference.
In other words, the drummer can be used as a more crucial part of your production tool-set, or it can just be a jumping-off point, so to speak.
Moreover, it’s a great way to quickly make a backing track to jam with if you’re a musician.
Before we begin…
First things first, if you want to access the drummers available in Garageband as well as the pre-sets, make sure you’ve downloaded all of the available sounds.
Just click on Garageband, in the top toolbar, then Sound Library, and then “Download All Available Sounds.”
In the image above, you can see that I’ve already downloaded all of the available sounds. As I’ve stated in other tutorials, you want to make sure you do this in a place with great internet.
Maybe even set it up while you’re sleeping.
How To Use The Drummer Track
If you want to throw in a drummer track, just go into your project or a New Project if you so choose.
Then, hit the (Option + Command + U) button to bring up a Drummer track. You can also do this through right-clicking on the track-pad and choosing the option manually as well.
From here, you’ll notice that Garageband gives you many drummers. I believe there are 28 of them in total.
It’s definitely worth noting that you can change the actual drum kit behind the drummer, but keep the style of percussion the same.
To do this, just click on whatever kit you want where it says “Sounds,” underneath the “Drummer” heading.
Three Main Settings of the Drummer Track
You can adjust the parameters of the drummer in three key ways, the individual drummer, the genre, and the sub-genre.
There are seven key genres to choose from: rock, alternative, songwriter, rhythm and blues, electronic, hip-hop, and then percussion.
Each sub-genre has between 3-6 drummers within it, depending on how big and popular the genre is. And each drummer name, for example, “Kyle,” or “Dez,” is classified using a sub-genre title within that genre.
Here’s the list:
Rock – Pop Rock, Retro Rock, Hard Rock, Punk Rock, Funk Rock, and Brit Pop.
Alternative – Indie Pop, Indie Disco, Indie Rock, Garage Rock, Modern 80s, and then Synth Pop.
Songwriter – Funky Songwriter, Pop Songwriter, Experimental Songwriter, Roots Songwriter, 60s Songwriter, Roots Brush, and then Pop Brush.
Rhythm and Blues – Modern R & B, Neo Soul, and Modern Motown
Electronic – Big Room EDM, Tech House, Dubsteb, Electro Trap, Modern House.

Hip-Hop – Trap, Modern Hip-Hop, Boom Bap
Percussion – Latin Percussion, Songwriter Percussion, Pop Percussion.
If you float your cursor above the drummer, the cursor will give you a quick description of each drummer, the type of person they are, and the style of music they play.
For the sake of this tutorial, we’ll choose Ian, who plays Britpop, and then we’ll use the stock drum-kit that comes with him, the Manchester.
Sub-Settings Of The Drummer Track
From here, you’ll notice that each drummer actually comes with a series of patterns to work with.
Garageband calls them “Beat Pre-Sets.”
Once you’ve selected the genre, the individual drummer/style, and then the beat preset, you can move on to adjusting more sophisticated and specific parameters.
In the image below, you can see what Garageband calls the X/Y Pad. It’s the trackpad that we can adjust by four parameters, Simple, Complex, Loud, and Soft.
Obviously, what you intend on using depends entirely on the style of music, but in my case, I usually air for Complex and then Soft, which means I’ll move the ball to the bottom-right-hand side of the X/Y Pad.
On the right side, there is the Swing and Fill option.
The Fill option just means the parts of the drumming that aren’t a main portion of the pre-set. They’re the little stylish patterns that you use to transition to other parts of the music.
If you split the drummer track using the (Command + T) function, you can add whatever fills you want to the last bar of the measure without changing the sound of the rest of the track.
If a noticeable rhythm section is integral to your style of music, then you’ll probably want to turn the “Fill” knob up. Turning it up to “Complex” on the X/Y Pad is a good move for this as well.
The “Swing” adjusts the amount of syncopation, which in other words, means the degree at which notes are played between the beat.
If you’ve created something that you like but want to switch drummers or drumming styles, make sure you’ve hit the Lock button beside where it says Fill and Swing. This will save your settings.
Also, make sure to adjust the drummer track region so it corresponds with the time signature of your music.
For instance, if your melodies are 4 measures, make your drummer track 4 measures, 8 measures, 16 measures, or another divisible of 4.
One of the great things about these drummer tracks is the fact they’re not static like loops. They’re essentially like artificial intelligence. They adjust themselves according to the music well.
Some people also like using the “Show Arrangement” option within the Track setting in the toolbar.
Additionally, you can actually use the Drummer Track to follow certain instruments over others.
In the Smart Controls of the Drummer Track, you can see the check-box which says, “Follow,” above the Kick and Snare parameter.
Click on the box, and it’ll ask you what instrument you want to follow. I actually don’t use this function ever, but I can definitely see how it’d be useful for others.

In case you don’t know, the drums typically work with the Bass, rather than the melodies, so keep that in mind.
Whether you choose to follow pre-determined standards is really up to you, though. Someone has to break the mold.
Considering all of its parameters, it’s really not hard to understand some of the ways that the Drummer Track comes in handy.
For instance, you can create separate Drummer Tracks for each part of the song, adjusted by complexity, the genre, the actual drum kit, as well as what instrument the Drummer Track follows.
The X/Y Pad is very sensitive as well. A simple move of the knob by a small measurement will make a big difference, in fact, I have a video in my other drummer track articlethat really demonstrates this feature.
You don’t always have to use the drummer track in such dramatically different ways; the changes can be very subtle.
You can also change the number of pieces to the kit using the picture of the drum-kit beside the X/Y Pad, rather than sliding the numbers.
Important Tip:Perhaps, one of the most important things here, especially when it comes to recording instruments in Garageband, is the fact that playing on time is crucial.
If you’re just using MIDI, then it’s really quite simple to place the notes on the grid-lines as you need to.
However, if you’re recording actual instruments, it’s very important to play along to a metronome like this one from Amazon, that way you’re actually on time.
And then when you introduce a drummer track, the drummer will actually sound good with what you’ve played.
In order to figure out the appropriate tempo at which you’re playing, you have to do it through trial and error.
The instrument that you’re playing, tap along with your foot to find out how fast it is, and then set the tempo to that BPM using the control center of the Top-Center of the DAW. Another great tool for music production concepts like BPM and tempo is PianoForAll (from their website), which is an excellent way to become acquainted with the connection between melody, timing, and rhythm.
You can also adjust the volume of each part of the drum-kit as you see fit, including turning off one part of the kit entirely. You can see the dials I’m talking about in the image 8 paragraphs down.
Just as an added tip for creating drums is to include plug-ins on the drum and rhythm section whether it be a Compressor, a Channel EQ, distortion, delay, or reverb.
To do this, just hit the “B”- key on your keyboard.
That should bring up your Smart Controls.
Then, go into the plug-ins and EQ whatever you need to, or add up a distortion plug-in to your snare if you need to.
When it comes to the drummer track, you can only load up a plug-in on the entire drum kit, rather than plug-ins on each part of the rhythm section when you’ve created the drums yourself.
For instance, one of the more common things that engineers do is they add a little bit of distortion to the snare drum. Especially for hip-hop and electronic producers.
Also, if you turn off and eliminate the Compressor and Channel EQ that comes default with the Drummer Track, you’ll have the option to adjust the “Dampen Kick” and “Dampen Snare” options.
Basically, what these knobs seem like they’re doing, is they’re moving the microphone away from the drumkit in the recording studio.
The “Dampen” knobs are trying to mimic the experience of an actual recording studio I guess.
These little details, while are great for really making your final mix sound amazing, aren’t super important for beginners.

But they’re worth keeping in mind for the future.
Moving on.
Let’s say for example, you wanted to introduce another fill, in addition to using the arrangement track and the “Follow” button to specify how you want to customize the kit.
You can just cut the drummer track wherever you want the fill to be.
After you cut a little piece of it out, select the new drummer track region, and turn up the fill to however high you want.
At this point, you could even change the drummer entirely if you wanted. Wouldn’t be a bad idea to keep the same kit though.
Through the use of the numbered features, “Percussion, “Hi-Hat,” and “Kick and Snare,” you can determine how much of the aforementioned instruments are included in the fill/verse/chorus/outro, and so on.
In other words, the drummer track is extremely customizable and in a variety of different ways.
The only two things that are missing really, are the ability to add plug-ins to only one part of the kit, as well as the inability to adjust precisely note by note.
I have a feeling this is just beginning though, and as the years ago by, the artificial intelligence will only be getting better.
Another important thing to add is the use of the “Groove Track.”
a) To access that, head into the “Track” region in the top tool-bar.
b) Select the option, “Configure Track Header.”
c) Now click the check-box that says, “Groove Track.“
d) From here, you can tell whatever Software Instrument to following the drums, or vice versa.
Personally, I don’t enjoy doing this because I feel like it’s pulling too much of my song out of my control, but I can imagine where it’d be useful for others.
If you tell Garageband to have one track follow another, you’ll notice that the MIDI notes actually shift in placement.
How To Turn The Drummer Track Into MIDI Notes
Perhaps one of the more useful features of the drummer track is the ability to quickly take the drum section and turn it into a MIDI file, that way we can separate each part of the kit into individual track regions for the sake of a better mix.
It’s incredibly simple. Here’s how to do it:
1) Select your drummer track, either through the (Option + Command + U) command or by selecting it manually.

2) Copy the track using the (Command + C) function, and then paste it into a new software instrument track.
3) Change the software instrument track to your drum kit of choice.
And that’s it.
Right away, you’re going to notice that the notes have been turned into MIDI notes, which is incredibly useful.
The next part, however, is far more time-consuming.
How To Make Bass In Garageband
In order to mix the drums properly, you want each part of the kit to be in a different track region, including the hi-hats, each tom (tom 1, tom 2, and tom 3), the snare, the kick, the crash, and so on and so forth.
How To Separate Each Part Of The Drum Kit For A Better Mix
1) Use the cursor to select the same MIDI notes that represent each part of the kit, for instance, the snare.
2) Select all of them by clicking on your trackpad and dragging a box over each part of it.
3) Use the (Command + C) function to copy them.
4) Now, determine what grid-line the very first MIDI note of the selected instrument falls on.
5) Paste the selected notes into the new track region.
6) Repeat this step for each part of the drum-kit.
When you’re done everything, it should look like what’s shown in the image below:
As I mentioned above, this can be quite time-consuming, as it probably takes around half-an-hour to do it. Perhaps someone in the comments could point out a faster way to do it (I found a better way to do it in my latest guide on the drummer track).
Conclusion
Obviously, having a real drummer is the way to go, but Garageband’s Drummer track is very good and it works amazing as a replacement in the meantime.
Through the adjustable parameters mentioned above, as well as the use of the Cut function, (Command + T), you can create varieties of fills, and you could even temporarily swap in a new drummer if you really like a particular fill or pattern.
Anyway. That’s all for now, thanks a lot for tuning in, and make sure to share it on your social media if it helped you out.
3 notes
·
View notes
Photo

Loopmasters Studio Bundle 95% OFF No-Brainer Deal! - Bedroom Producers Blog http://dlvr.it/RKKzRY
0 notes
Photo

Hello peeps if your looking for some Cyber Monday deals these websites always have good deals on one you spend a $1 and you get a free plugin for your music creation needs woop woop 👽 Swipe ——> . . . . . #pluginboutique #loopmasters #sampletoolsbycr2 #plugins #vstplugins #loops #samples #sounds #music #edm #deals #cybermonday #websites #woop #woopwoop #free #stuff #dontforgettofollowme #dontforgettofollow #newmusic #comingsoon #izotope #elements #audioplugins #musiccreation https://www.instagram.com/p/Bqp-7GtgXP_/?utm_source=ig_tumblr_share&igshid=1rkk4o6k5m4rq
#pluginboutique#loopmasters#sampletoolsbycr2#plugins#vstplugins#loops#samples#sounds#music#edm#deals#cybermonday#websites#woop#woopwoop#free#stuff#dontforgettofollowme#dontforgettofollow#newmusic#comingsoon#izotope#elements#audioplugins#musiccreation
0 notes
Text
Deals on Tuesday, April 21, 2020
Lorex Technology 20% Off Analog 4k Security Systems & Cameras
Tap offer to copy the coupon code. Remember to paste code when you check out. Online only.
Lorex Technology Promo Code: dvr20 (1 People Used Today)
#LorexTechnologycouponcodes #LorexTechnologypromocodes #LorexTechnologydiscountcodes
From: Lorex Technology coupon codes
Rebecca Minkoff Up to 50% Off Most Wanted Styles
One Week Only! Spring Sale! Get Up to 50% Off Most Wanted Styles
#RebeccaMinkoffcouponcodes #RebeccaMinkoffpromocodes #RebeccaMinkoffdiscountcodes
From: Rebecca Minkoff promo codes
Loopmasters 20% Off Leon Switch Pack
Get 20% off Leon Switch pack. Offer is valid for a single use per customer. Ends 01/05/2015.
Loopmasters Promo Code: LSWTCH20 (-1 People Used Today)
#Loopmasterscouponcodes #Loopmasterspromocodes #Loopmastersdiscountcodes
From: Loopmasters promo codes
Photo Canvas Land Gallery Wrap Photo on Canvas Sale For $17.95
ON SALE! Shop Gallery wrap 8"x8" photo on canvas sale for $17.95
#PhotoCanvasLandcouponcodes #PhotoCanvasLandpromocodes #PhotoCanvasLanddiscountcodes
From: Photo Canvas Land coupon codes
Alibaba 5% Off Your Order
Tap offer to copy the coupon code. Remember to paste code when you check out. Online only.
Alibaba Promo Code: REDFREE (-1 People Used Today)
#Alibabacouponcodes #Alibabapromocodes #Alibabadiscountcodes
From: Alibaba coupon codes
Alibaba 5% Off Your Order
Tap offer to copy the coupon code. Remember to paste code when you check out. Online only.
Alibaba Promo Code: REDFREE (-1 People Used Today)
#Alibabacouponcodes #Alibabapromocodes #Alibabadiscountcodes
From: Alibaba promo codes
The Crab Place Extra $10 Off $125+ Seafood Orders
Tap offer to copy the coupon code. Remember to paste code when you check out. Online only.
The Crab Place Promo Code: happy23 (50 People Used Today)
#TheCrabPlacecouponcodes #TheCrabPlacepromocodes #TheCrabPlacediscountcodes
From: The Crab Place promo codes
0 notes
Text
Metallica Madness Takes Over Fortnite: The Ultimate Music Showdown!

Hey there music and gaming enthusiasts! Get ready to rock and roll as Fortnite is about to experience an electrifying transformation with the epic integration of Metallica into the gaming universe! This monumental collaboration between Epic's online F2P battle royale and the legendary Metallica is bound to set the gaming and music world on fire.
In Epic Games' upcoming updates, prepare for an adrenaline-pumping experience as Metallica's iconic band members make their way into the Fortnite universe. Players can immerse themselves in the thunderous energy of Metallica's best tracks as these legendary songs become part of the Fortnite soundtrack. Brace yourselves for an epic showdown as a new mode centered around battling other players using music is set to rock the gaming community to its core.
The fusion of gaming and music is set to reach new heights, offering a groundbreaking experience for Fortnite players and Metallica fans alike. Get ready to unleash your inner rock star and conquer the battlefield with the power of music!
Make sure to take a look at the Affiliate Program. 💻🌟 Plugin Boutique Deals AI SINGERS CLONING STEMS Splitter AI SINGERS and MUSIC (new) MAKE YOUR VOICE LIKE FAMOUS SINGERS UNLIMITED BACKUP STORAGE LOWEST PRICE! AI VIDEO EDITOR CAPCUT AI AI VIDEO GEN Best Audio Plugin Deals Loopmaster Deals Loopcloud Deals #PluginBoutiqueDeals #LoopmasterDeals #LoopcloudDeals #AudioPluginDeals #MusicSoftwareDeals #MusicProductionDeals #SoundDesignDeals #AIVideoEditor #CapCutAI #AIVideoGen #AISingers #VoiceTransformation #AffiliateMarketing #AffiliateProgram
The arrival of Metallica in Fortnite is not just a game-changer; it's a revolutionary crossover that solidifies the influence of music in the gaming realm. The immersive experience of battling it out with Metallica-inspired elements promises an unforgettable journey for gamers and music enthusiasts around the globe.
So, gamers and music aficionados, mark your calendars and gear up for an unparalleled fusion of music and gaming as Metallica descends upon the world of Fortnite. This electrifying collaboration is bound to leave an indelible mark on both the gaming and music industries, transcending boundaries and paving the way for an unprecedented era of entertainment.
Get your controllers ready, tune up your instruments, and prepare for the ultimate showdown as Metallica takes center stage in Fortnite. It's time to rock, roll, and conquer the virtual realm like never before!
Stay tuned for more updates as the Metallica madness unfolds in Fortnite!
Rock on, gamers! 🎸🎮🤘
#MUSIC TECHNOLOGY#MUSIC PRODUCER#MUSIC PRODUCTION#MUSIC COMPOSER#🎸🔥🎮#Metallica#Fortnite#MusicBattle#GamingCommunity
0 notes
Text
Musician @lackofafromusic Teams With @loopmasters For "Organic Soul Vol 2" Sample Kit
youtube
When it's time to get high-quality sample loops, stems and hits for your samples library of the funkiest degree, look no further than Freestyle Records musician Lack Of Afro. Co-signed by production legends such as Madlib and Pete Rock, LOA aka Adam Gibbons brings a variety of flavor on his 2019 sample kit "Organic Soul Vol 2". For an 803MB pack, LOA brings ace musicians, vintage analog gear and most importantly unique talent and an ear for all things funky and soulful. From the first few seconds, it's clear "Organic Soul Vol 2" is the real deal which celebrates a distinctive sound reminiscent of our most celebrated samples and breaks from the crates. Dig in and taste the raw flavor of "Organic Soul Vol 2", a collection of 56 loops composed and performed by LOA and his band. The pack includes separate stems of each loop so you can utilize percussion, bass, guitar, organ, horns and more instruments to your liking.
DOWNLOAD ORGANIC SOUL VOL. 2 BY LACK OF AFRO
Adam Gibbons - bass, guitars, keys, drums, percussion, saxophones, production George Cooper - keys Matt Carter - keys Elliott Cole - vocals Rory Simmons - trumpets Steve Down - guitars Nick Radford - guitars via Blogger https://ift.tt/2Z3C5mK
0 notes
Text
Get the whole thing you wish to have to make studio quality recordings to your Mac or PC, multi functional box. Scarlett Solo Studio Pack includes the compact Scarlett Solo USB audio interface, a big-diaphragm condenser microphone, closed-back headphones, and the entire cables and software you wish to have to start out recording with a pc. Also, Scarlett Solo Studio now comes with an exclusive version of Pro Tools | First Center of attention ceremony Creative Pack, in addition to Ableton Reside Lite. It’s compatible with all major DAWs, on Mac and PC. It takes handiest minutes to set up for the primary time, then you’ll be able to just plug straight in and get started recording. Includes: Scarlett Solo USB audio interface, condenser microphone, headphones, 10′ XLR mic cable, mic stand clip One natural-sounding Scarlett mic preamp with a variety of even gain; one newly-designed instrument input, designed to deal with seriously hot guitar pick out-ups Class-leading conversion and sample rates as much as 192kHz / 24 bit; super-low roundtrip latency for the usage of your plug-ins in real time with out the desire for DSP Complimentary Sure Grid Bias Amp 2 LE by means of download upon purchase and registration till November 1. Includes Pro Tools | First Focusrite Creative Pack and Ableton Reside Lite, Softube Time and Tone Bundle, Focusrite’s Red Plug-in Suite, 2GB of Loopmasters samples, Collection of one free XLN Addictive Keys virtual instrument, all to be had by means of download upon purchase and registration Supported Sample Rates: 44.1 kHz, 48 kHz, 88.2 kHz, 96 kHz, 176.4 kHz, 192 kHz. Frequency response – 20 Hz – 20 kHz ± 0.1dB. Compatible with Windows 7 and better, and Mac OS X 10.10 and better. 2-year limited warranty on manufacturing defects [amz_corss_sell asin=”B01E6T54E2″] Focusrite Scarlett Solo Studio (2nd Gen) USB Audio Interface and Recording Bundle with Pro Tools | First Get the whole thing you wish to have to make studio quality recordings to your Mac or PC, multi functional box.
0 notes
Video
youtube
Buy it on Amazon - http://ift.tt/2CrbE2i - Buy Novation Launchkey 49 USB Keyboard Controller for Ableton Live, 49-Note MK2 Version -- Click the link to buy now or to read the 244 4 & 5 Star Reviews.Subscribe to our Channel: https://www.youtube.com/channel/UCt4-xP8yLcwe7YYjGjGLvgg?sub_confirmation=1 Like us on Facebook for videos, pictures, coupons, prizes and more - http://ift.tt/2wCDdi2 Buy Novation Launchkey 49 USB Keyboard Controller for Ableton Live, 49-Note MK2 Version Looked all over and found the best deal. Delivered as promised.... Reviewer : Isabella Gave this as a gift and it was a great hit. Would purchase again. Amazon Review... Reviewer : James Click http://ift.tt/2CrbE2i to buy now on Amazon or to read more reviews. 16 velocity-sensitive RGB pads, 8 knobs, and dedicated navigation and control buttons Software for Mac and PC Fully USB bus-powered and class compliant; works without drivers or power cable Software for Mac and PC, Including: Ableton Live Lite, XLN Audio Addictive Keys, Novation Bass Station and V Station virtual instruments and over 4GB of Loopmasters samples Excellent quality considering the price. Would buy again without a doubt. Amazon Review... Reviewer : Avenue Click http://ift.tt/2CrbE2i to buy now on Amazon or to read more reviews. ***Let Us Know What You Think… Comment Below!!*** Watch my other review Videos – https://www.youtube.com/channel/UCt4-xP8yLcwe7YYjGjGLvgg See other products on http://ift.tt/2xhK4Ru Subscribe to our Channel: https://www.youtube.com/channel/UCt4-xP8yLcwe7YYjGjGLvgg?sub_confirmation=1 Like us on Facebook for videos, pictures, coupons, prizes and more - http://ift.tt/2wCDdi2 #Novation, #Novation Launchkey 49 USB Keyboard Controller for Ableton Live, 49-Note MK2 Version This is a review video for : B00VVK2A3I Manufacture : Novation Thanks for watching! http://ift.tt/2xhK4Ru Related Videos in Channel
0 notes
Video
youtube
Buy it on Amazon - http://ift.tt/2CrbE2i - Cheap Novation Launchkey 49 USB Keyboard Controller for Ableton Live, 49-Note MK2 Version -- Click the link to buy now or to read the 244 4 & 5 Star Reviews.Subscribe to our Channel: https://www.youtube.com/channel/UCuqKuBtQlbe13pWCxeLaSng?sub_confirmation=1 Like us on Facebook for videos, pictures, coupons, prizes and more - http://ift.tt/2wCDdi2 Cheap Novation Launchkey 49 USB Keyboard Controller for Ableton Live, 49-Note MK2 Version Looked all over and found the best deal. Delivered as promised.... Reviewer : Isabella Gave this as a gift and it was a great hit. Would purchase again. Amazon Review... Reviewer : James Click http://ift.tt/2CrbE2i to buy now on Amazon or to read more reviews. 16 velocity-sensitive RGB pads, 8 knobs, and dedicated navigation and control buttons Software for Mac and PC Fully USB bus-powered and class compliant; works without drivers or power cable Software for Mac and PC, Including: Ableton Live Lite, XLN Audio Addictive Keys, Novation Bass Station and V Station virtual instruments and over 4GB of Loopmasters samples Excellent quality considering the price. Would buy again without a doubt. Amazon Review... Reviewer : Avenue Click http://ift.tt/2CrbE2i to buy now on Amazon or to read more reviews. ***Let Us Know What You Think… Comment Below!!*** Watch my other review Videos – https://www.youtube.com/channel/UCuqKuBtQlbe13pWCxeLaSng See other products on http://ift.tt/2xhK4Ru Subscribe to our Channel: https://www.youtube.com/channel/UCuqKuBtQlbe13pWCxeLaSng?sub_confirmation=1 Like us on Facebook for videos, pictures, coupons, prizes and more - http://ift.tt/2wCDdi2 #Novation, #Novation Launchkey 49 USB Keyboard Controller for Ableton Live, 49-Note MK2 Version This is a review video for : B00VVK2A3I Manufacture : Novation Thanks for watching! http://ift.tt/2xhK4Ru Related Videos in Channel
0 notes
Video
youtube
Buy it on Amazon - http://ift.tt/2CrbE2i - Discount Novation Launchkey 49 USB Keyboard Controller for Ableton Live, 49-Note MK2 Version -- Click the link to buy now or to read the 244 4 & 5 Star Reviews.Subscribe to our Channel: https://www.youtube.com/channel/UC5hRJcS7QwnZYX8wwXpMtiw?sub_confirmation=1 Like us on Facebook for videos, pictures, coupons, prizes and more - http://ift.tt/2wCDdi2 Discount Novation Launchkey 49 USB Keyboard Controller for Ableton Live, 49-Note MK2 Version Looked all over and found the best deal. Delivered as promised.... Reviewer : Isabella Gave this as a gift and it was a great hit. Would purchase again. Amazon Review... Reviewer : James Click http://ift.tt/2CrbE2i to buy now on Amazon or to read more reviews. 16 velocity-sensitive RGB pads, 8 knobs, and dedicated navigation and control buttons Software for Mac and PC Fully USB bus-powered and class compliant; works without drivers or power cable Software for Mac and PC, Including: Ableton Live Lite, XLN Audio Addictive Keys, Novation Bass Station and V Station virtual instruments and over 4GB of Loopmasters samples Excellent quality considering the price. Would buy again without a doubt. Amazon Review... Reviewer : Avenue Click http://ift.tt/2CrbE2i to buy now on Amazon or to read more reviews. ***Let Us Know What You Think… Comment Below!!*** Watch my other review Videos – https://www.youtube.com/channel/UC5hRJcS7QwnZYX8wwXpMtiw See other products on http://ift.tt/2xhK4Ru Subscribe to our Channel: https://www.youtube.com/channel/UC5hRJcS7QwnZYX8wwXpMtiw?sub_confirmation=1 Like us on Facebook for videos, pictures, coupons, prizes and more - http://ift.tt/2wCDdi2 #Novation, #Novation Launchkey 49 USB Keyboard Controller for Ableton Live, 49-Note MK2 Version This is a review video for : B00VVK2A3I Manufacture : Novation Thanks for watching! http://ift.tt/2xhK4Ru Related Videos in Channel
0 notes
Text
Last Night a DJ Saved My Life Charity Sample Loop Pack
Last Night a DJ Saved My Life Charity Sample Loop Pack
Last Night a DJ Saved My Life Charity Sample Loop Pack
Also, click here, to get the best Drum Packs, Loops Kits, And Sound Libraries out there” Also, click here, to get the best Vst plugins at crazy discounted prices”
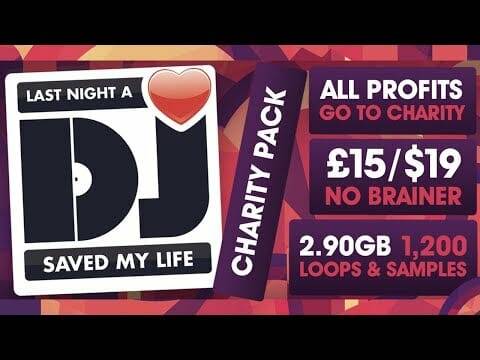
Check out the Sample Pack | http://bit.ly/2GbqYDc Get Deals on Sample Packs | http://bit.ly/2GamuwJ
Loopmasters are proud to present the LNADJ Charity Pack! This one is a…
View On WordPress
#audio loops#drum bank#Drum Kits#drum pack#loop pack#Loops kits#Royaltee free samples#samples#sound bank
0 notes
Video
youtube
Buy it on Amazon - http://ift.tt/2CrbE2i - Novation Launchkey 49 USB Keyboard Controller for Ableton Live, 49-Note MK2 Version Coupon -- Click the link to buy now or to read the 244 4 & 5 Star Reviews.Subscribe to our Channel: https://www.youtube.com/channel/UC34yudB5hvLGFwHHPVXKwtg?sub_confirmation=1 Like us on Facebook for videos, pictures, coupons, prizes and more - http://ift.tt/2wCDdi2 Novation Launchkey 49 USB Keyboard Controller for Ableton Live, 49-Note MK2 Version Coupon Looked all over and found the best deal. Delivered as promised.... Reviewer : Isabella Gave this as a gift and it was a great hit. Would purchase again. Amazon Review... Reviewer : James Click http://ift.tt/2CrbE2i to buy now on Amazon or to read more reviews. 16 velocity-sensitive RGB pads, 8 knobs, and dedicated navigation and control buttons Software for Mac and PC Fully USB bus-powered and class compliant; works without drivers or power cable Software for Mac and PC, Including: Ableton Live Lite, XLN Audio Addictive Keys, Novation Bass Station and V Station virtual instruments and over 4GB of Loopmasters samples Excellent quality considering the price. Would buy again without a doubt. Amazon Review... Reviewer : Avenue Click http://ift.tt/2CrbE2i to buy now on Amazon or to read more reviews. ***Let Us Know What You Think… Comment Below!!*** Watch my other review Videos – https://www.youtube.com/channel/UC34yudB5hvLGFwHHPVXKwtg See other products on http://ift.tt/2xhK4Ru Subscribe to our Channel: https://www.youtube.com/channel/UC34yudB5hvLGFwHHPVXKwtg?sub_confirmation=1 Like us on Facebook for videos, pictures, coupons, prizes and more - http://ift.tt/2wCDdi2 #Novation, #Novation Launchkey 49 USB Keyboard Controller for Ableton Live, 49-Note MK2 Version This is a review video for : B00VVK2A3I Manufacture : Novation Thanks for watching! http://ift.tt/2xhK4Ru Related Videos in Channel
0 notes
Photo

New Post has been published on https://learnhowtowritesongs.com/best-songwriting-articles-2017/
Best Songwriting Articles Learn How to Write Songs Blog 2017
Taking a look back at 2017 here are the best songwriting articles on the Learn How to Write Songs blog.
There are a variety of subjects that songwriters find useful. You will find these are the most popular for this year.
These posts are filled with an abundance of tips, ideas, insights written to help you write better songs..
In case you missed these blog posts or neglected to bookmark them for future reference and inspiration, here are the Best Learn How to Write Songs Blog Posts of 2017 and don’t forget to leave a comment to join the discussion:
#1 – Chord Progression for Songwriters
Chord progressions are a vital part of song writing. Let’s learn how to construct a chord progression.
#2 – Understanding Royalty Free Samples and Loops
It is so simple to create your own music productions. This is because of the availability of computers and music software. Songwriter, music producers are creating their own songs and one tool they like to use is samples and loops. Finding samples and loop are extremely easy to find with stores like Loopmasters. Making sure that the samples are legal to use in your production can be a minefield. If done the wrong way could get very expensive. To help make it easier to acquire music samples with less risk many content providers offer Royal Free Music.
#3 – Making Song Lyrics Rhyme
For those of you who like to write songs where the lyrics rhyme, here’s a term you should be familiar with. ‘Rhyme scheme‘ refers to where the rhyming words occur in a verse or a chorus.
#4 – Songwriting Programs
To help songwriters learn how to write songs this collection of learning resources was created. Each of resources collectively deal specifically with songwriting and will provide valuable information. Add these to your personal library.
#5 – How to Add Emotional Impact to Your Songs
Either you are writing sad songs about love, or some songs about happiness, you need make the right song structure. You can add emotional impact to your songs with the right lyrics, using deep and emotional lyrics at all times.
#6 – Rhyme Patterns and Types Used in Songwriting
One fundamental part of a song is the rhyme. This poetic device helps provide appeal to the song’s lyric. Lyrics are written according to certain patterns. These patterns are fairly predictable. That is because rhymes work in a manner that the listener expects to hear.
Do all lines in a song lyric need to rhyme? Not necessarily. With songwriting there is a unique balance between predictability and surprise. If there is too much predictability, then the song can sound trite, boring or uninspiring. On the other end of the spectrum, a song with too many surprises will lend itself to confusion and chaos.
#7 – Music Scales for Songwriters
At the heart of every song is the melody. The melody is a mix of tones and rhythmic patterns. In order to create a melody there needs to be a musical scale. The scale for the songwriter is like the pallet for the painter. The painter has on the pallet various paint colors that can be mixed to create new colors that are added to the canvas to render a picture.
0 notes